Showing posts with label Custom Form. Show all posts

Thursday, February 9, 2012

Re-enabling Form Fields and Form Validation

In my last post I showed you how to disable form fields and controls like the Submit button.

Well, that's not going to do you much good unless you can re-enable the button and submit the form. Using a little more jQuery, here's how to peform a little form validation and do just that.

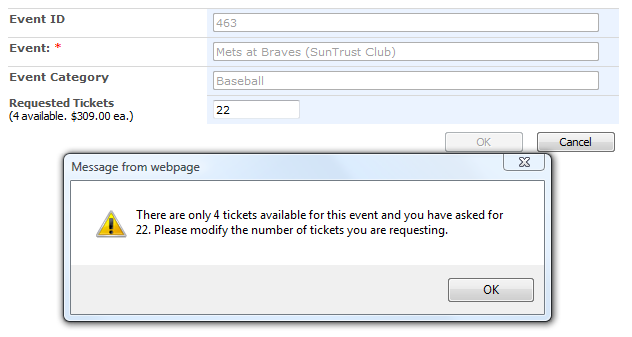
Notice the field "Requested Tickets?" It's the only field on the form that you can actually modify. I'm going to attach some form validation to this field to make sure the user doesn't enter an invalid quantity.

If you'll notice, underneath the text "Requested Tickets" it tells you how many tickets are available- 4. (How I got this there is the subject of another post.) If the user requests 10 tickets then the form should (politely) let them know that it's not going to happen and the Submit button should stay disabled.

But if the user requests four or less tickets, then all should be right with the world and they should be allowed to submit their request.

To place validation on the "Requested Tickets" field, go into SPD and add an ID to the SharePoint:FormField's parent td. Something like id="tktsReq" should do.

BTW- Sometimes, SPD likes to add the mysterious {generate-id()} to ID fields that you add on your own. See Marc Anderson's blog post on how to get around this.

Now, go back to your content editor web part and add the following function to your script

function checkTktReq(){
var tktsAvailable = $("input[title='Available']").val(); // value taken from a hidden form field
var tktsRequested = $("input[title='Requested Tickets']").val();
if(tktsAvailable<tktsRequested){
$('#btnSubmit :input').attr('disabled','disabled');
$('.disableMe :input').attr('disabled','disabled');
alert('There are only ' +tktsAvailable+ ' tickets available for this event and you have asked for '+tktsRequested+'. Please modify the number of tickets you are requesting.' );
} else {
// Re-enable the Submit button
$('#btnSubmit :input').removeAttr('disabled');
// Re-enable the form fields. Otherwise, you'll get an error.
$('.disableMe :input').removeAttr('disabled');
}
}

and to the $(document).ready function, add...
$("#tktsReq").keyup(checkTktReq);

This little piece is going to listen for changes to the Ticket Request field and call the function checkTktReq() which compares the value entered to the number of tickets available and responds accordingly. You don't have to use the "keyup" event. You could use change, keydown, or a variety of others. Feel free to use whatever works best for your purposes.

So let's see it in action!
If there are 4 tickets available and I ask for 22 I get a nice error message and the form remains disabled.

But, if I ask for only 2 tickets, the value is valid and the submit button is re-enabled.


I hope this helps!

CG

Wednesday, February 1, 2012

Disabling Form Fields

There are times when you want to disable or hide certain form fields or controls in SharePoint. I've found that a little jQuery is your best friend here. You can either disable items by their ID or by using a class.

Put a content editor web part on your page and add the following code...

<script language="javascript" type="text/javascript" src="http://code.jquery.com/jquery-1.7.1.min.js"></script>
<script language="javascript" type="text/javascript">
$(document).ready(function() {
// Disable form field/control using ID
$('#btnSubmit :input').attr('disabled','disabled');
// Disable multiple fields/controls using class
$('.disableMe :input').attr('disabled','disabled');
});
</script>

For individual items that you want to disable by ID, go into your customized form using SPD or Fiddler and get the ID's you need.


For multiple items that you want to disable by using class, go into your customized form and make sure to add "disableMe" to the class of the form field's parent table data tag ().

Note: You can't add it to the "SharePoint:FormField" control because it won't take a standard "class" attribute and the "CssClass" attribute won't work here. If you add the class to the parent 'td' tag, the script will apply that class to the first child of that tag.

Here's what you get...


This works in SPD2007 also.

Hope this helps!

CG

(BTW- I know that the form won't do you much good with a disabled submit button and I don't reference any validation or method of enabling the button again. That's a topic for the next post- Form validation using jQuery.)

Tuesday, January 10, 2012

Attachments and Custom Forms using SharePoint Designer 2010

If you're going to customize forms in SPD 2010 (or SPD 2007 for that matter), be aware of a few things where attachments are concerned- When creating custom SharePoint forms via SPD (aspx, not InfoPath), many people only hide the original form by setting "isVisible" to "false" then adding a custom list form to the page. Setting isVisible to False.
If you do, you're likely to get a save conflict along the lines of "Failed to get value of the 'Attachments' column from the 'Attachments' field type control blah blah blah... "
Failed to get value of the 'Attachments' column from the 'Attachments' field type control.  See details in log. Exception message: Guid should contain 32 digits with 4 dashes (xxxxxxxx-xxxx-xxxx-xxxx-xxxxxxxxxxxx)..


Some work arounds:


If you want to keep attachments enabled:
Delete the original form. Don't just hide it! Hiding it only keeps it from displaying though the browser. The Attachment control is still there and the two form's attachment controls will conflict with each other.


If you don't need attachments you could do either of the following:
Disable attachments before you create a custom form.
Disable attachments warning message.
This will make your life a lot easier. But it may not be feasible if you're asked as often as I am to make customized forms after someone else has created the list.
-OR-
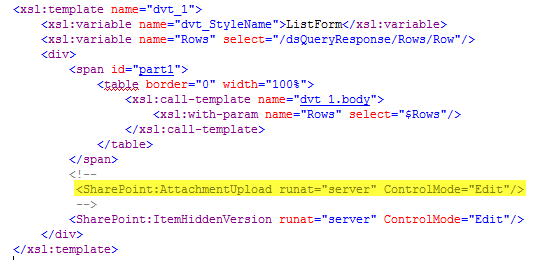
Edit the attachment control and display in the XSLT. Comment out the "SharePoint:AttachmentUpload" control in the dvt_1 template.
Comment out SharePoint:Attachments control in XSLT
Then comment out the "Attachments" row in the XSLT as well. Just to be tidy. That's usually at the bottom of the dvt_1.rowedit template.
Commenting out Attachments row in XSLT
You should be good to go!

CG